Our interior in our coach was serviceable, but according to my wife, it looked "tired". With that in mind, I took on a very, very aggressive project of remodeling the interior. I do not have many pictures of the original interior, thus, I guess it was too tired to photograph. Oh well...., it must have been tired.....
The upgrade included stripping all the interior out of the coach, all window trim, all window shades and carpet.
I removed the dash to recover the upholstery on the dashboard. The word "
challenge" should be respected before taking on this project. I carefully marked each wire disconnected for later reassembly. With dashboard out, I took advantage of this to upgrade my dash lighting with custom LED assemblies. I discovered lighting I did not know I had. Building the custom LED fixtures was time consuming, but necessary. Unfortunately, I neglected to take any pictures of this phase of the project.
As a sidebar note, I have heard other Country Coach owners' comments on the low quality of the wire connectors used by Country Coach. Well, I second those comments. Part of the time consuming project was sorting out wiring issues related to these connectors.
With the interior removed, I contracted with "Infinity Commercial Upholstery and Interior" in Nacogdoches, Texas for recovering the two front seats, sofa, Lazy Boy recliner, dining seat cushions, and all window valances. Basically, anything that required upholstery was sewn by this company. I did not have the equipment required for sewing heavy upholstery.
During reassembly, all Silhouette blinds were replaced with the same, manual cord draws. I considered upgrading to electrics, but we are comfortable with the manual shades, and they work all the time. All rope lighting was also replaced in the salon area and door entry area.
Carpet was replaced by
Texas Motor Coach in Pipe Creek, Texas. I did not have the proper tools or experience to install carpeting. I intended to replace the carpet padding but discovered that the original carpet padding was a multi layered foam soundproofing material (two layers of soft foam, with a high density layer of foam in the center). My decision to replace the flooring with carpet was personal for us. We prefer carpet to hard flooring surface.
A sidebar note for Country Coach owners: I had the foam replaced in kind on the driver's seat. Also, I added a one` inch layer of memory foam to all of the interior seating, including the dining chairs. This single upgrade has given our seating a luxurious comfort feel. I highly recommend this addition.
Also, while the ISRI seat was removed, I corrected a few air leaks under the suspension seat. Easy to check with the seat removed.
Removing the window trim represented a challenge. The Country Coach has a one piece pressure formed wood board for the window trim. The board on the drivers side was 16 feet long (16' x 4') and required the removal of the front windshield in order to remove the piece.
Removing the windshield was easy. The first time I removed the passenger's side windshield, it took 30 minutes and 20 minutes to replace it. Not bad! I purchased two glass suction cup holders from Harbor Freight. Highly recommended! Also, I had acquired the special tool for reinserting the rubber trim around the windshield and several "non metal" trim spoons and tools to slide between the windshield and the glass.
The resulting upgrade was great. Our coach is clean and fresh on the inside. I would recommend the upgrade for any coach owner that felt the interior was "tired". However, if you are not willing or able to take on a long term project that is very labor intensive, I would suggest looking into various vendors offering remodeling. We felt like we saved a ton of money, plus, the results were driven by what we wanted, not what a vendor wanted.
I would recommend an interior upgrade to anyone looking to freshen up the interior of their coach. When I was looking into this, I had bids of 20K to 45K. This is a very noticeable expense. The upgrade, including new carpet and blinds, cost approximately $16K, doing all the work yourself.
Another comment, my wife and I are 62 years old. As most of us know, it is harder to do this type of physical work as we get older. Use this as a gauge to determine if you want to take this project on. It took me 3-1/2 months, working an average of 5 - 6 hours per day. The result is great!
If you have any questions about remodeling your coach, please feel free to contact me through the POG forum or leave a comment on this blog. This was a great learning experience.
Texasdrifters
PICTURES
Here we are removing the salon furniture. After removing the captain and copilot chairs, we started removing the sofa. The sofa can be removed through the front door but will need to be partially disassembled in the coach.
The arms will need to be removed, then the sofa extended to slip through the door opening.
![]()
The door entry handles were removed to provide easy access in removing furniture through the door.
This looks a little frightening, but each item was removed and labeled for easier reinstallation at a later date.
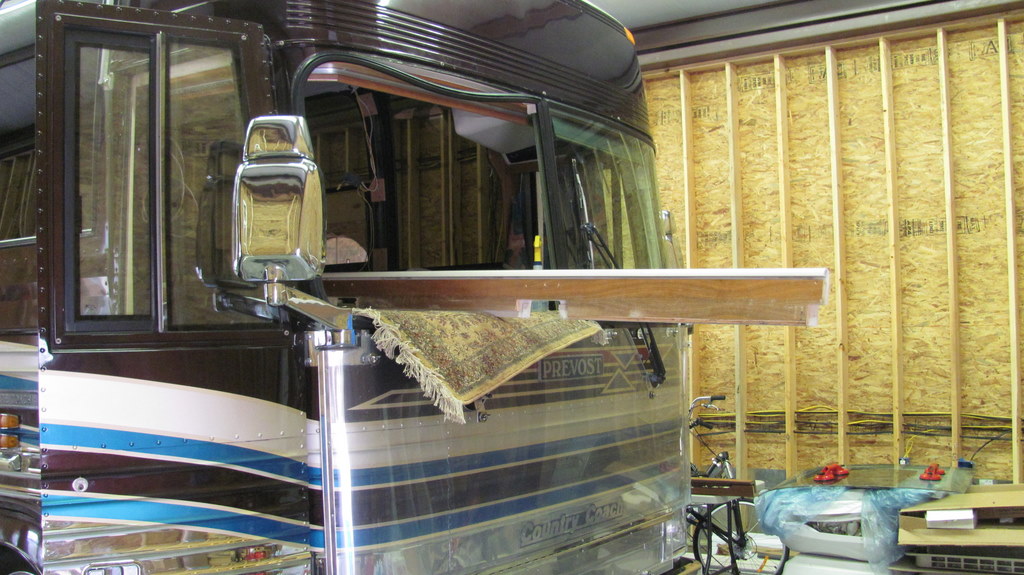
The window side panels were removed and staged in the living room for removal. One side had to be removed out the front windshield.
This was my first time to ever remove an XL windshield. I order a couple of glass suction cup holders and a few non metal tools for handling the rubber gaskets for removal and installation. It took me 30 minutes to remove and 20 minutes to reinstall. Not bad for a beginner.
Windshield removed. Note my Harbor Freight glass rubber suction holders.
One of the side window trim pieces was 16 feet long and 4 feet wide. No way would it go through the entry door. The passenger side front window was removed to make it easier in removing the large panels.
Finally, both pieces are removed and laying on my driveway. Ready to be recovered. Whew!
My helper and wonderful wife. She was very helpful and supportive throughout the entire process.
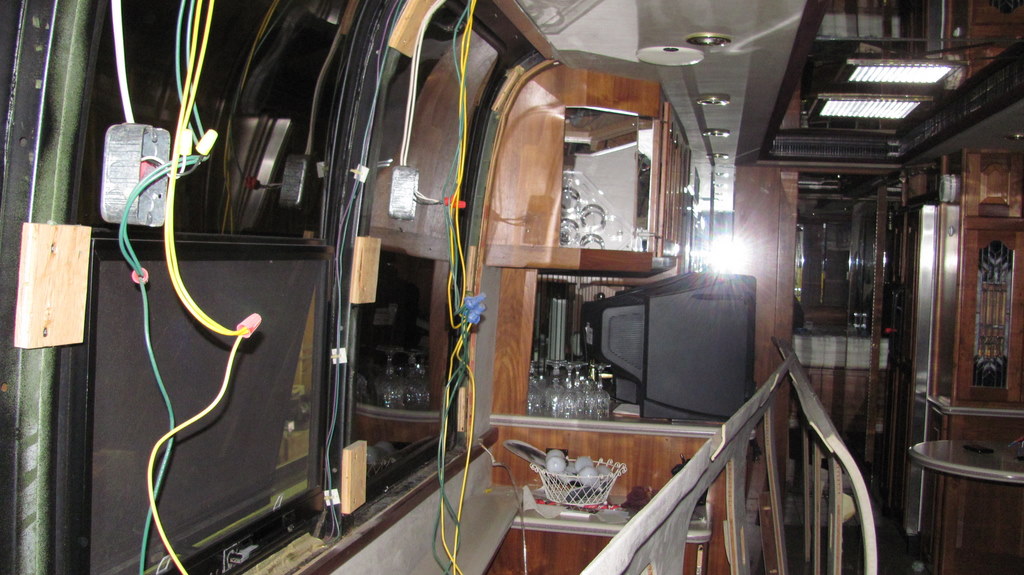
I started disassembling the dash. I did get a little nervous at this stage.
There are a lot of wires in there. Humm... I hope I can get this back together?
As a nationally famous POG member stated, "Don't get your panties all wadded up", when you get to this part. This part is not for the "faint at heart". Several friends stopped and looked over the project. The comments varied wildly when they saw this. Remember, you only focus on one wire or connector at a time.
More wires! And more wires! Note the metal structure installed by Prevost to brace the front of the bus. Big iron!
I also removed the window trim boards, resanded and refinished. They look great!
It took three days of working 6 - 7 hours per day to reinstall the dash. When the moment of truth arrived, turn the key to start the coach, I took a deep breath, turned the key and the engine started up. I had to troubleshoot one alarm not functioning correctly. Of all the wiring disconnected and reconnected, I impressed myself on this one. While I had the dash out, I upgraded the dash back lighting with custom LED fixtures. I discovered lights that I did not know I had.
Dash area, with newly covered seat and new carpet. Clean and fresh!
A shot of the driver's side window panel. Recovered with new material. Looks great!
Copilot seat with a custom back rest pillow. Made by my wife.
My lazy boy recliner. Notice the "Texasdrifters" head cloth. A personal touch.
Lee embroidered custom trim around the door handle and the door lock.
I added the raised "Texas Drifters" logo, with rope decorative trim.
Our dog wondering what the "hell" happened to her house on wheels.